How to resize RAID 1 partition without data loss?
Hardware RAID 1 provides data protection feature, so it is widely used by many companies, as data security is most important. However, the same with single physical hard disk, the virtual drive on RAID 1 array also runs low of free space. All the size of virtual partitions on the RAID array are carefully allocated while building the Server and RAID, is it possible to resize RAID 1 partition without losing data or rebuilding the RAID array? The answer is definitely yes. in this article, I’ll show you how to resize RAID 1 partition on Windows Server 2016/2012/2008/2003 (R2) and Windows 10/8/7/Vista/XP. Actually, it is very easy!
Overview:
Benefits of hardware RAID 1
RAID 1 is usually implemented as mirroring; a drive has its data duplicated on two different drives using either a hardware RAID controller or software (generally via the operating system). If either drive fails, the other continues to function as a single drive until the failed drive is replaced. Conceptually simple, RAID 1 is popular for those who require fault tolerance and don’t need top-notch read performance. A variant of RAID 1 is duplexing, which duplicates the controller card as well as the drive, providing tolerance against failures of either a drive or a controller.
Why resize RAID 1 partition
RAID 1 is used to installing Operating System for most cases, so sooner or later you’ll encounter the problem that system C: drive runs out of free space and becomes full, because many kinds of files write into C drive continuously. By resizing partitions, you can extend C drive easily without wasting days to start from scratch.
Why RAID partition can be resized
To Operating System, the RAID 1 array is the same with a physical hard disk after you building the RAID array. A virtual drive in this RAID array also the same with single physical disk partition. The only difference from physical disk partitions is that data read and write controlled by RAID controller instead of Windows.
It is also the same with resizing physical disk partition to resize RAID 1 volume. You just need to shrink a virtual partition of the same RAID 1 array to get some Unallocated space, and then you can easily extend the system or other data drive with this Unallocated space.
How to resize RAID 1 volume
Before resizing, remember 2 points:
- Do not break the RAID array or do anything else on the RAID controller.
- Only volumes in the same array can be resized, so open the computer Disk Management console to find out the disk partition layout. If there is Unallocated space or free space in other drives in this array, you can resize RAID 1 volume easily.
Steps to resize RAID 1 partition:
Step 1: Download and install NIUBI Partition Editor Server, right-click drive D: and select “Resize/Move Volume“.
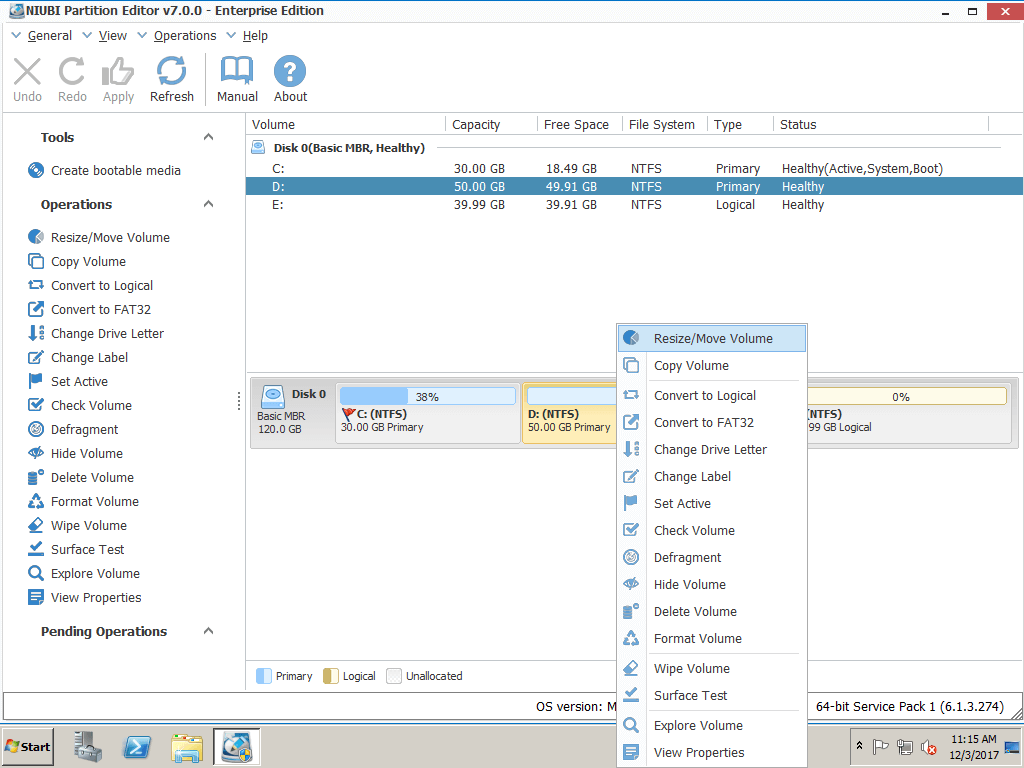
Step 2: In the pop-up window, drag the left border rightwards to generate free Unallocated space.

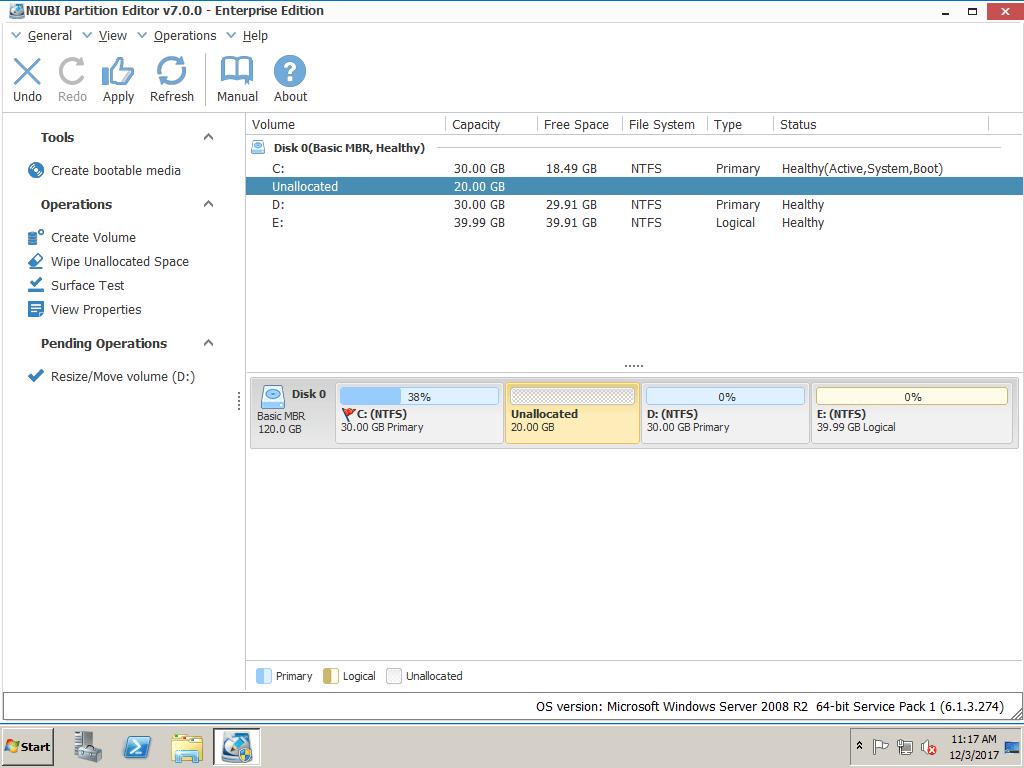
Click OK and back to the main window, where 20GB Unallocated space created behind C: drive.
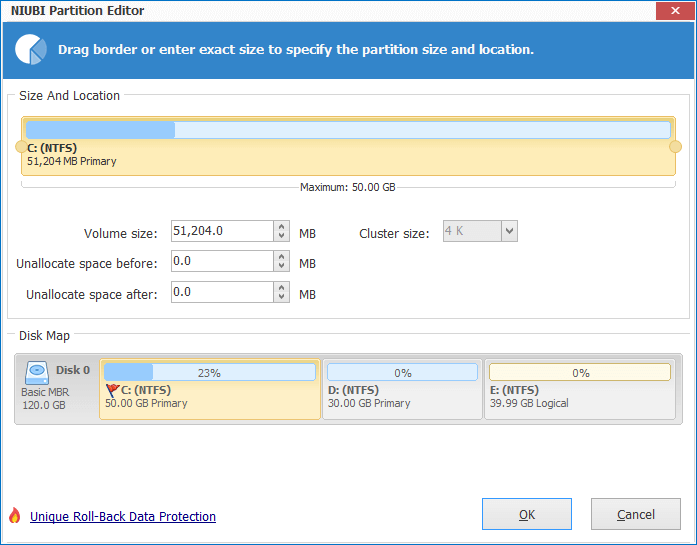
Step 3: Right click C drive and select “Resize/Move Volume” again, in the pop-up window, drag the right border rightwards to hold the Unallocated space.

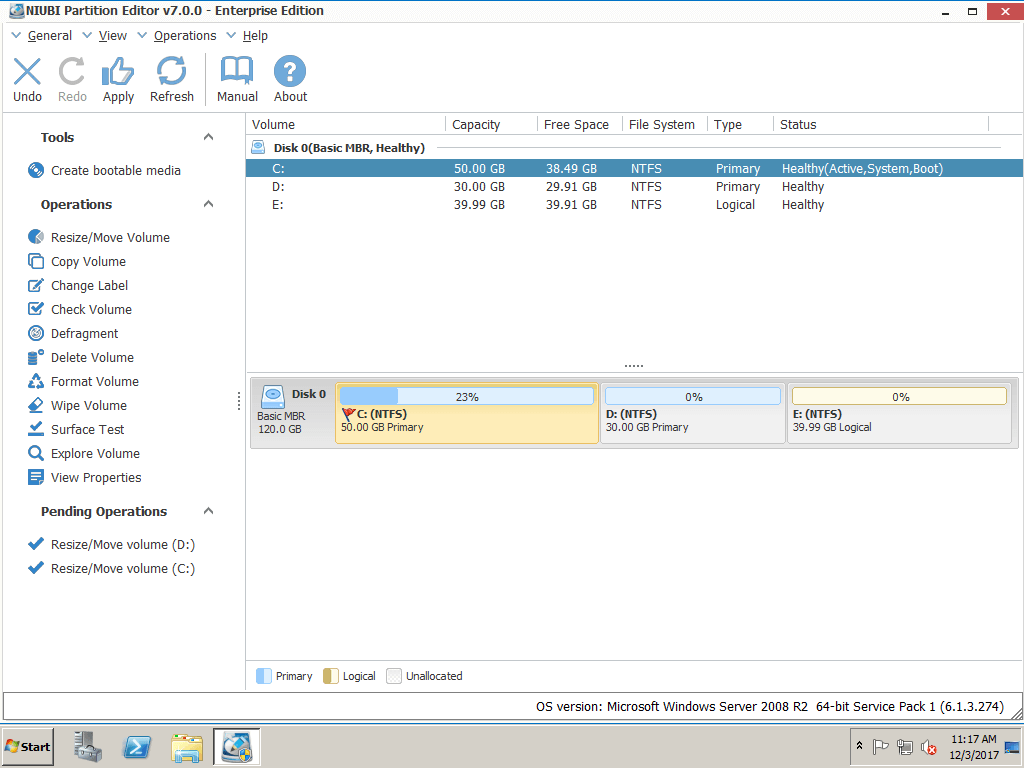
Click OK and back to the main window, where C drive extended to 50GB by holding the 20GB free space from D. Press Apply on top left to execute, done!
If there is existing Unllocated space, or not enough free space in volume D, follow the steps in the video:
To resize RAID 1 partition, I always recommend NIUBI Partition Editor, because:
- Better than other tools, it integrated unique Roll-Back Protection technology, which is able to roll back the server to the status before resizing automatically and rapidly, even if power failure or any other hardware issue occurred during resizing. Operating System and all data keep intact during the whole process.
- The unique file-moving algorithm helps resize partition 30% -300 faster than other tools, which is strictly tested. In some situations such as: large amount of the files in the partition that you want to resize, high CPU usage rate and low computer memory, it can be 500% faster.